

In This Lesson You Will Learn How To Upload A Video In YouTube
The purpose of this lesson is to gain an understanding of the process of uploading a video to Youtube and how to optimise the video’s content.
Step By Step Instructions
Uploading A Video To YouTube
YouTube used to display a button labelled ‘Upload’ in the header of the site (alongside the Search bar). Following recent updates however, YouTube has since gone with a more simplified camera icon decorated with a ‘+’. This will then drop-down from which you can choose to ‘Upload video’ or ‘Go-live’.
YouTube Video File Types
There are several specifications to keep in mind when producing video content for the YouTube platform. Firsty the video dimensions. This is important to consider both for quality of the video, as well as the layout of which the video will display and crop to screen sizes.
The optimal dimensions are as follows:
- 426 x 240 (240p)
- 640 x 360 (360p)
- 854 x 480 (480p)
- 1280 x 720 (720p)
- 1920 x 1080 (1080p)
- 2560 x 1440 (1440p)
- 3840 x 2160 (2160p)
Maximum file size for video upload is 128GB or 12 hours in duration, whichever comes first.
File types you are able to upload are as follows:
- MOV
- MPEG4
- MP4
- AVI
- WMV
- MPEGPS
- FLV
- 3GPP
- WebM
YouTube Video Upload Settings
When uploading video content to YouTube, there are a number of settings that are required to input. These settings will help YouTube understand not only the content of your video, but also how it will be grouped with other content.
These settings also allow opportunity for users to engage with external content, for example, social links within Video Descriptions.
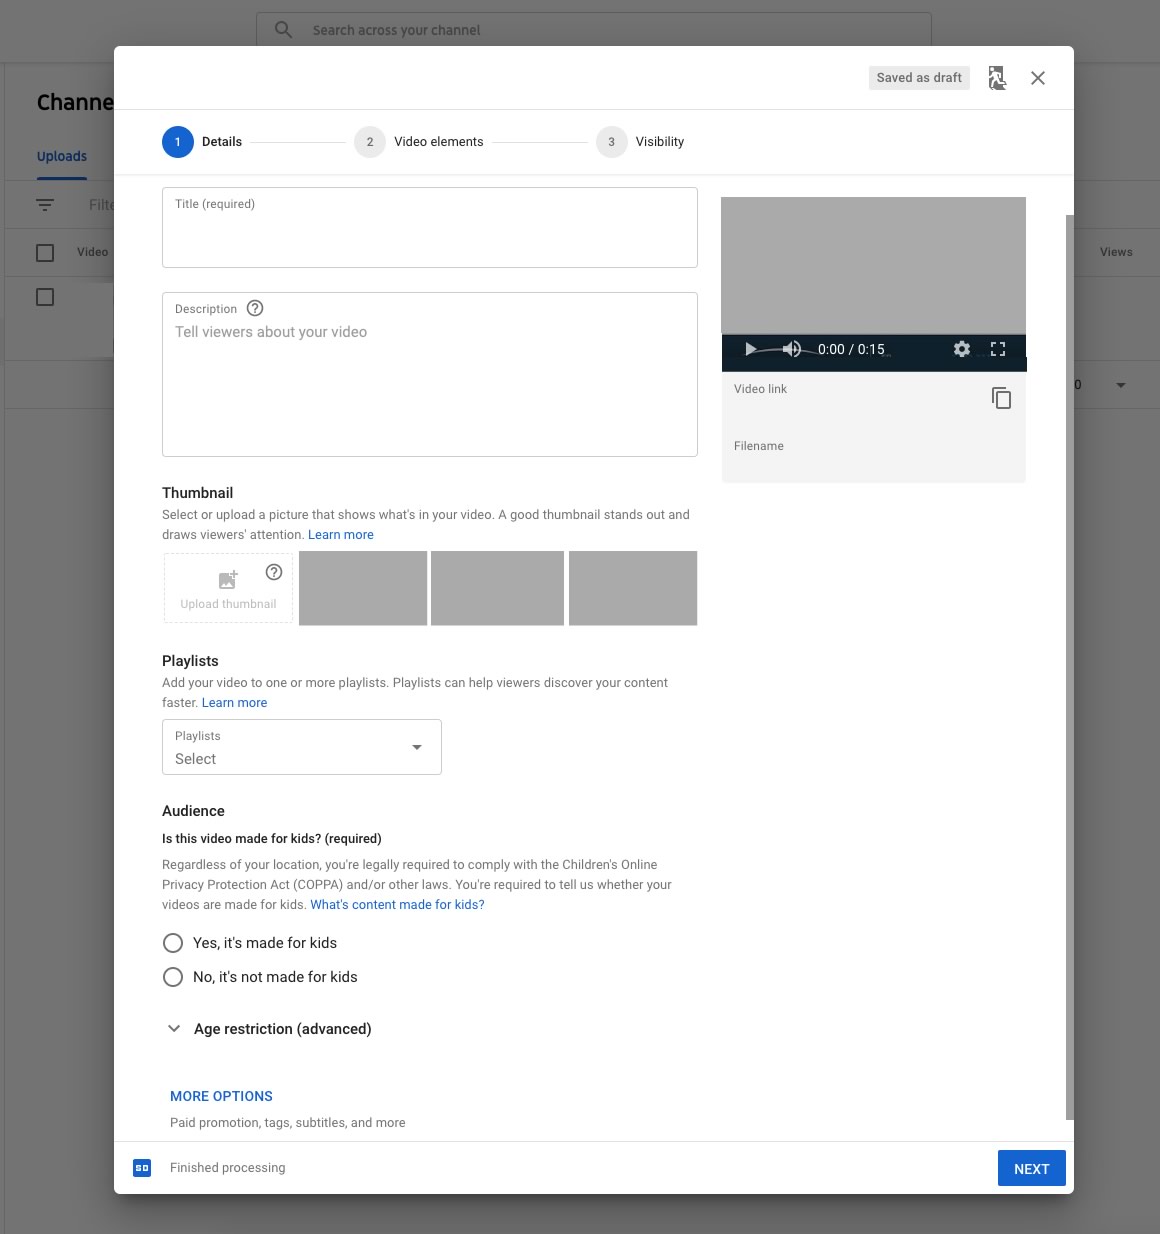
Details:
- Within the Details page of the upload, you need to set a video Title and Description. Ensure these are relevant to the video content and/or purpose of the channel. Within Titles and Descriptions, you can set up to 3 linkable hashtags. These may benefit your video for relevancy ranking.
- From this page, you can also set the video Thumbnail that will appear in search results, recommendations, and links to the video shared on social media. YouTube offers 3 default Thumbnails from stills of the video, though if you have verified your channel, you are able to upload a custom thumbnail.
- If your video is relating to other content on your channel, you may want to add it into a Playlist. This is useful if the video is within a series, or is categorised such as ‘How To’ videos.
- Recent updates to the platform have now required users to specify if their video content is made for kids. This is due to ‘Children's Online Privacy Protection Act’ (COPPA).
- Under ‘More Options’ you can set video Tags. Tags aren’t as necessary for the video discovery as title and descriptions, though it is still recommended to be used if there are common misspellings of terms used in the video.
- Ensure to set your videos Language and align with the most relevant Category. You can also choose whether to Allow, Disable, or Hold comments for review under the Comments and ratings section.
Video Elements:
- Video Cards and End Screens can be useful to keep users engaged with your content or associated websites. Cards appear as an annotation icon at the top right of a video and when clicked, shows a menu overlaying the video of Cards applied to the specific video.
Visibility:
- This is probably the second most important part of the video upload process. This is where you will choose whether your video is able to be seen by the public (Public), only visible if a user has a direct link to access the video (Unlisted), or only your admin access to the channel can view the video (Private).
- In addition to this, you can also choose to Schedule a video if you are wanting it to be public at a later date, you will just need to input the given date and time you want your video live.
If you are having an issue, we can help. Please get in touch.
YouTube has a built-in editor suite where you can trim your video footage, add blurs over the footage, or add music from the YouTube Music Library. In order to access these features, navigate to Youtube Studio and from the Videos tab, select the video you wish to edit. Then from the left menu, select Editor.
Once a video has gone live, you can definitely change this to be private. You will often notice channels that are longer running will often have older, less professional videos removed.
These aren’t necessarily ‘permanently deleted’, they are often just set as Private. This can be done if you are logged in to the channel that is the owner of the video.
Navigate to the video you wish to be set as private, and in the Description section below the video, select ‘Edit Video’. Once on the Video details page, select ‘Visibility’ on the right hand side, and from the drop-down, select ‘Private’ and ‘Done’.
Either one of two this will happen, black bars may appear on the sides or top and bottom of your video, or the video player will display dynamically, aligning with your video’s aspect ratio. For example, depending on your browser/device, a square (1:1) video can be shown within a square video player, otherwise it will appear letterboxed within a landscape player.